Getting started with development on the Android Wear platform can be challenging. Here are my notes on how to get started quickly.
Before you do anything! 1. Back up your IntelliJ configuration if you use IntelliJ at all. 2. Install Android Studio. Do NOT try to use IntelliJ to do Android Wear development.
Once you’ve got Android Studio installed you’ll need to do some setup on your devices (watch and phone) to get them working. Here I assume you’re using physical devices for your phone and your watch, no emulators.
Enabling debugging on your Android Wear device
The first time you set up your watch for remote debugging do the following:
- Tap your watch face to get the “Speak now” prompt
- Tap the screen again to get the list of options
- Scroll down to “Settings” and tap it
- Scroll down to “About” and tap it. If you see “Developer options” in this list already you do not need to do this procedure since it has already been done.
- Scroll down to “Build number” and tap it 7 times. You should get a message that says “You are now a developer!”.
- Swipe to the right to get the previous menu
- Scroll down to “Developer options” and tap it
- Tap “ADB debugging” if it says it is disabled
- Tap “Debug over Bluetooth” if it says it is disabled
After your Android Wear device has been set up once you’ll only need to follow these steps to re-enable debugging if you ever disable it:
- Tap your watch face to get the “Speak now” prompt
- Tap the screen again to get the list of options
- Scroll down to “Settings” and tap it
- Scroll down to “Developer options” and tap it
- Tap “ADB debugging” if it says it is disabled
- Tap “Debug over Bluetooth” if it says it is disabled
Enabling debugging over Bluetooth from your Android phone to your Android Wear device
- Open the “Android Wear” app
Tap the settings icon at the top of the screen (the two gears that look like the icon below)
- Make sure “Debugging over Bluetooth” is checked
- Once it is checked two fields will appear below it. They are “Host” and “Target”. “Target” will say “connected” when your watch is connected to your phone. “Host” will say “connected” when ADB is connected to your watch.
Setting up ADB for Android Wear debugging over Bluetooth
Make sure ADB sees your phone:
- Connect your phone via USB and make sure USB debugging is enabled
Run
adb devicesfrom the command line. You should get some output like this:$ adb devices List of devices attached 01234567890abcdef deviceCheck to see if there is a device in the list called “localhost:4444”. If so, you are already paired and ready to go. You do not need to do this procedure.
To connect ADB to your watch run
adb forward tcp:4444 localabstract:/adb-hub; adb connect localhost:4444and you should see this:$ adb forward tcp:4444 localabstract:/adb-hub; adb connect localhost:4444 connected to localhost:4444Run
adb devicesagain and you should see this:$ adb devices List of devices attached 01234567890abcdef device localhost:4444 deviceIf you do not see the
localhost:4444entry then double check that ADB debugging and Bluetooth debugging are enabled on your watch. Then check to make sure Bluetooth debugging is enabled in the Android Wear app on your phone. Once those are verified you can run this command again and it will try to reconnect.
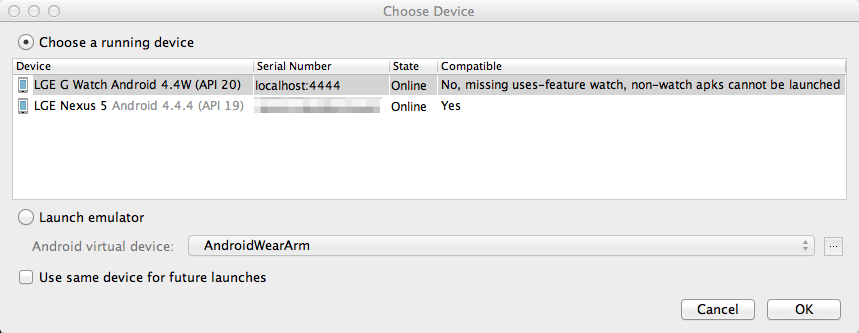
Now that you’ve done all of that Android Studio should give you a dialog like this when you try to run or debug an application: