If you are trying to use SIPML5 with Asterisk there are some gotchas that often come up. If you’re running it on Debian these tips below may help.
If you haven’t gotten that far with Asterisk and don’t care about your current configuration you can try this procedure that I use to build Asterisk myself:
Download latest Asterisk, extract it, and cd into the directory it was extracted into
Build Asterisk. NOTE: I have only had problems running a multi-job make so I would suggest you do not include a -jX option to take advantage of all of your cores.
1
make
Install Asterisk
1
sudo make install
Build the samples and overwrite your current configuration. You lose everything here so skip this step if you want to keep your config.
1
sudo make samples
Start Asterisk with crazy verbosity so you can see what is going on
1
sudo /usr/sbin/asterisk -vvvvvvvvvvvvvvg
There are two issues I ran into when trying to use SIPML5.
Error #1: no protocols out of ‘sip’ supported – in Asterisk console
In this case chan_sip.so probably isn’t built. Check in make menuconfig, add libssl-dev via apt-get, re-run ./configure, make menuselect, verify that resource module res_crypto is enabled.
Error #2: SRTP issues
If you are having SRTP issues you probably get one or more of these messages:
In the browser – Not acceptable here
In the Asterisk console – Received SAVPF profile in audio offer but AVPF is not enabled
In the Asterisk console – Insufficient information in SDP
In the Asterisk console – No SRTP module loaded, can’t setup SRTP session
In the Asterisk console – Rejecting secure audio stream without encryption details
In this case res_srtp.so probably isn’t built. Check in make menuconfig, add libsrtp0-dev via apt-get, re-run ./configure, make menuselect, verify that resource module res_srtp is enabled.
Good luck and post in the comments if it worked for you or if you need some help.
Open Chrome and point it to the SIPML5 index.html in /var/www (or the subdirectory you put it in)
Click “Enjoy our live demo”
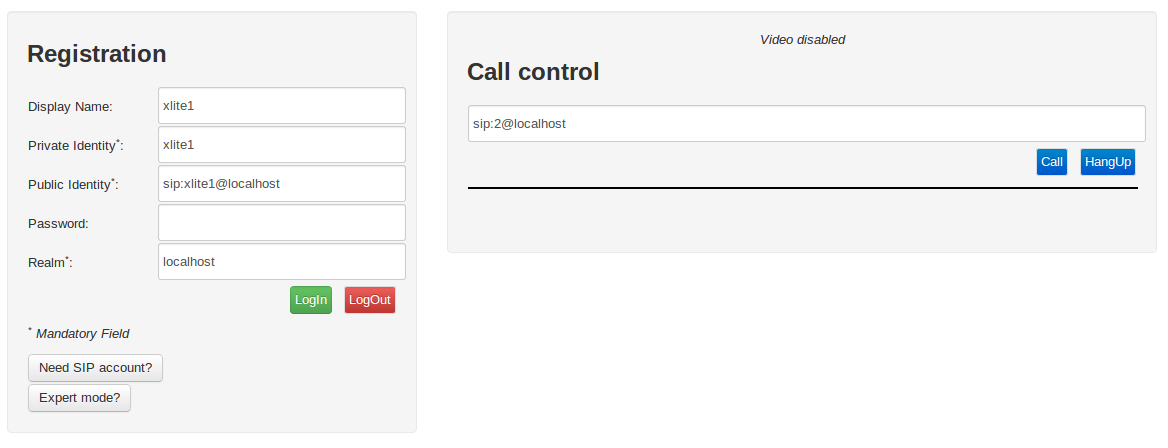
Set these values in the “Registration” panel
Display Name: xlite1
Private Identity: xlite1
Public Identity: sip:xlite1@localhost
Realm: localhost
Password is left blank
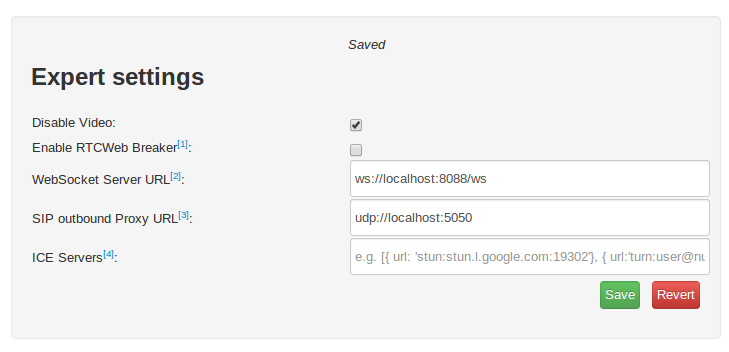
Click “Expert Mode”
Set these values in “Expert settings”
Disable Video: Checked
Enable RTCWeb Breaker: Unchecked
WebSocket Server URL: ws://localhost:8088/ws
SIP outbound Proxy URL: udp://localhost:5060
Click “Save”
Close “Expert settings” tab
Enter “sip:2@localhost” in the “Call control” field
Click “Call”
At this point you should hear audio coming from Asterisk in a few seconds and your first call is complete. Now you can build out your server as you’d want!
Here are some screenshots of the SIPML5 settings just in case you want to visually double-check.
This is all business. I wrote this up a long time ago and never got a chance to put it online. Enjoy!
First, install SSH:
Go to Synology web GUI
Open Control Panel
Click “Terminal”
Check “Enable SSH service”
Click “Apply”
Set up your users so they have a home directory:
Go to Synology web GUI
Open Control Panel
Click “User”
Click “User Home” button at the top
Check “Enable user home service”
Select the volume on which the home directories should be stored
Click “OK”
Connect via SSH and make sure it works:
ssh as admin to the Synology box. Use the same password you use as admin on the web GUI. If you leave it blank, even if your password is blank, it will always fail. You must have a non-blank password! This is to protect against your device getting compromised from having no password.
If you get the “Diskstation>” prompt then it is working
Connect via SSH and make sure non-admin/non-root logins work:
Connect as a regular user. If you get permission denied SSH back in as root and change the desired user’s shell from /sbin/nologin to /bin/ash in /etc/passwd.
I am running Debian on a BeagleBone Black at home as a toy server/sandbox. One application that I thought would be interesting to run on it was the standard Bitcoin client. I think it is a bit strange that the latest version of the Bitcoin client (0.8.6 at the time I wrote this) doesn’t use “configure” like most other Linux/Unix applications because it leads to having to track down dependencies during a build rather than before them. On a normal system this might not be a big deal because Bitcoin compiles in just a minute or so. On a smaller device like the BeagleBone Black though it means you’ll end up checking in on it periodically over a long period of time only to find that it needs another dependency.
In their defense the github version DOES use a “configure” script. I found that out after going through a manual build on 0.8.6 so for completeness I’ll show how to compile both and you can use whichever one suits your needs. The configure script on a lean device like the BeagleBone Black still takes quite a while to run though so this should get you through doing the process just once.
You can use either the current stable version today which is 0.8.6 or you can use the bleeding edge github source. I would recommend 0.8.6 if you want something that is as stable as possible. When compiling from source you should keep in mind that your build may not be compatible with old wallet formats.
I cannot stress this enough – IF YOU HAVE AN OLD WALLET YOU ARE BEST OFF USING THE OFFICIAL BINARIES INSTEAD OF BUILDING FROM SOURCE!
Using version 0.8.6
If you want to use version 0.8.6 here’s what you need to do:
Remove the binaries, these are Intel binaries and won’t work on the BeagleBone Black anyway
1
rm bitcoin-0.8.6-linux/bin/*/*
Go to the src directory
1
cd bitcoin-0.8.6-linux/src/src
Build the source
1
make -f makefile.unix
If you follow these instructions you should get Bitcoin up and running in just one build cycle. Here are the commands that you should run:
Using the latest Bitcoin development version (NOT RECOMMENDED!)
NOTE: I do not recommend that you use this version. Currently Debian does not have libdb4.8 in its default repository and the Bitcoin client requires it to maintain compatibility with existing wallet files.
If you want to use the latest development version here’s what you need to do:
cd bitcoin
./autogen.sh
./configure --with-incompatible-bdb
make
Now you’ll have the bitcoind executable sitting on your BeagleBone Black. When you try to run it the first time it will complain that some variables aren’t set and that your config is incomplete. The output will look something like this:
1234567891011
debian@arm:~/bitcoin/src/src$ ./bitcoind
Error: To use bitcoind, you must set a rpcpassword in the configuration file:
/home/debian/.bitcoin/bitcoin.conf
It is recommended you use the following random password:
rpcuser=bitcoinrpc
rpcpassword=XxXXxXXxxxXxXXxXXXXXXxxxxXxxxxxXxXXXXXxXxxXx
(you do not need to remember this password)The username and password MUST NOT be the same.
If the file does not exist, create it with owner-readable-only file permissions.
It is also recommended to set alertnotify so you are notified of problems;
for example: alertnotify=echo %s | mail -s "Bitcoin Alert" admin@foo.com
What you’ll need to do is put these values into the ~/.bitcoin/bitcoin.conf. Then you can restart bitcoind and it’ll run and start grabbing the blockchain. IT IS INCREDIBLY IMPORTANT THAT YOU DO NOT COPY THE VALUES THAT I PUT HERE. Your file will look like this (except the rpcpassword will be whatever bitcoind told you):
This password gives someone complete access to your bitcoind instance. If you store money there and use the rpcpassword value that I put above you can and probably will lose it.
Unless you have a giant SD card on your BeagleBone Black you’ll probably want to put your blockchain on a different disk. I have my Synology home directory mounted on my BeagleBone Black via NFS (as explained in another post). It is mounted at ~/synology. In order to make sure my blockchain is on my Synology I did the following:
You may get a few errors about files not existing when you run this. This is normal and you should try to proceed and see if it works for you. I was very careful here to not put bitcoin.conf or the wallet.dat file on the Synology. You should also avoid putting those files on there. Since the remote file system is potentially a shared resource an attacker can get into that and modify or steal data. It’s best to keep the wallet.dat, peers.dat, and bitcoin.conf local to your BeagleBone Black.
At this point you can restart bitcoind. I did this in a screen session rather than make it a true service since I’m still playing around with it. Once I set it up as a service I’ll post an update and include that information as well. I am a bit skeptical that it will stay stable since after just a few hours it is already taking up 50% of the BeagleBone Black’s RAM. I guess I’ll just have to wait and see.
Periodically check your free file system space and make sure that the blockchain isn’t on your SD card. In my case I can do this:
12345
# Show the amount of free space on my SD carddu -sh /
# Show the amount of free space on my Synology NASdu -sh ~/synology/
Good luck and post in the comments if this helps you out or if you need any assistance.
I originally purchased my Synology NAS because of all of the packages that it offers and the fact that it was supposed to give me one less thing to manage. After a few failed attempts at getting OpenVPN to work and some Plex issues I decided that I needed to have something a little less opaque that I could install different packages on. I wanted something small, low power, and solid state so I decided to use the BeagleBone Black.
I tried using both CIFS/Samba and sshfs to mount the Synology’s filesystem but both of them had extremely strange issues with the applications I planned on using. I wouldn’t recommend either of them for production work involving Linux and NAS. Often it would tell me that files didn’t exist even though I could clearly see they were there. After moving to NFS none of this happened anymore.
NOTE: Security here is all done by IP address so this is not suitable for a sensitive environment!
Here are the steps I went through to connect my first enable and configure NFS on my Synoloy NAS:
Make sure your BeagleBone Black has a static IP and that you know what it is
Log into the Synology web GUI as an admin
Click “Control Panel”
Click “Win/Mac/NFS”
Click “NFS Service”
Make sure that “Enable NFS” and “Enable NFSv4 support” are checked
Click the link that says “Shared Folder”
Find and select the directory you want to share. In my case it was my user account’s home directory so I selected “homes”.
Click the “Privileges” drop down
Select “NFS Privileges”
Click “Create”
Enter your BeagleBone Black’s IP address into the “Hostname or IP” field
Make sure that the “Privilege” field is set to “Read/Write”
Make sure that the “Root squash” field is set to “No mapping”
Make sure that “Enable asynchronous” is checked
Make sure that “Allow connections from non-privileged ports (ports higher than 1024” is NOT checked
Click “OK” in the “Create an NFS rule” popup
Take note of the “Mount path” field in the “Edit NFS privileges of homes” window, you’ll need this later
Click “OK” in the “Edit NFS privileges of homes” window
Log out of the Synology web GUI
Now you have your Synology all set up to accept NFS connections from your BeagleBone Black. Here are the steps to do that:
Connect to your BeagleBone Black via SSH as a user that can run sudo
Install the NFS utilities and client by running “sudo apt-get install nfs-common”
Go to your home directory
Create a directory for your Synology mount point. I chose “synology”.
Mount your directory using the “Mount path” from above along with any additional paths to get you to the desired directory you want. My mount path was “/volume1/homes” but I wanted “/volume1/homes/tim” for my actual home directory. The command I used was “sudo mount -t nfs synology:/volume1/homes/tim /home/tim/synology/”
Test out your newly mounted Synology NAS
You can now add this to your /etc/fstab file if you’d like but I prefer to keep it in a script. I have a script called mount-nfs.sh in my home directory that I run when necessary since I’m still testing out NFSv4. Once I get it stable I’ll make sure that I get it to mount automatically the proper way and update this post.
Potential issues
If you receive an error message that says “mount.nfs: access denied by server while mounting synology” you probably have the wrong IP for your BeagleBone Black in the Synology configuration.
If it appears to mount the volume but no files show up try unmounting it and re-mounting it. If you unmount it successfully and when re-mounting it again it complains that the device is busy it is possible that your BeagleBone Black’s IP address changed. This happened on my test machine when its IP went from 192.168.1.109 to 192.168.1.110. It didn’t give me the access denied error message but instead exhibited this weird behavior. If this is the case make sure you have your IP assigned statically, reboot the BeagleBone Black, verify the static IP in the Synology configuration again, and then try re-mounting the path. After that mine started working again.
Good luck! Post any success stories or issues in the comments. I’ll do my best to help out if possible.
Reading resources in Java has always been a mystery to me. It’s not because I don’t understand how to do it but more that I do it so infrequently that
I always forget what I need to do. In Java’s defense once you understand what you need to do it’s actually very simple. I’ve run into this issue
many times in a professional context. Usually it is just trying to load a simple resource so I can keep it inside the JAR file I’m delivering to a
client.
The sixty second explanation of how to do this is as follows. If you’re using an IDE and have a standard project layout you can simply follow these steps:
Under your src/main directory create a new directory called “resources”
Put your static file in the “resources” directory. For example, “jquery-1.10.2.min.js” if you want to serve this file from an embedded web server.
And that’s it! I recommend the long way because you can step through it if the file isn’t found and get some insight into what happened rather than
just getting an opaque NullPointerException. If you don’t have the file in the directory, or you have the wrong file name, after attempting to get
the jqueryUrl it’ll just be NULL. If that happens just check to make sure that you have the file name correct, resources is spelled correctly, and
it is in the right location.
Good luck! Post in the comments if you find this useful or if you have trouble.
I finally got tired of dealing with Wordpress and all of the baggage that comes along with it. I’ve migrated to Octopress and it feels nice.
We’ll see if it makes me post any more or not though. It appears that this is my only post for the entire year so far.
If you can recommend any themes that look a bit nicer than this please post in the comments.
UPDATE 2013-12-30: This is on hold permanently. I never ended up having the time (this post is from way over a year ago) and PoE just isn’t on my radar lately as I’ve shifted more towards security and software testing.
PoE (Power over Ethernet) is an exciting and promising technology. I think that a lot of people take it for granted now that you can plug your IP phone into an Ethernet jack and it gets data and power over that single connection. It’s easy to forget that your IP phone isn’t a real landline with convenience like this.
One thing that has been frustrating about PoE over the years is not supply side availability but consumption side hardware for hobbyists. You can find very cheap PoE switches online and that’s great for all of your pre-fab gadgets (IP phones, WiFi access points, even video cameras) but implementing PoE in your own projects has been tough to say the least.
There is now an Arduino board that supports PoE but if you’re using an existing Arduino board (Mega, etc), a Netduino Plus, or a single board computer you are still out of luck if you want to use PoE so far. Don’t get me wrong you can do it but it takes significant electronics experience, a multitude of components, and even some luck since not all PoE mid-span devices follow the standard perfectly. When using PoE with a non-compliant mid-span device you will certainly run into grounding issues that can range from a minor hassle to project killing either from noise or magic smoke. I haven’t experienced magic smoke yet but I’ve definitely seen issues with noise and FTDI boards connecting and disconnecting from USB when hooked into a PoE circuit powered by a non-compliant device.
As far as the mid-span devices go you’ll have to do your homework to find one that is compliant and that might even mean buying a few devices to test them out. So far I’ve had some luck with a Phihong PSA16U-480 although there have been a few times where I’ve gotten the network TX/RX to stop working while the PoE portion still works. I never did conclude whether it was a circuit problem, a Phihong problem, or a cabling problem though so I would say that so far the Phihong has been the best. On the other hand my Intellinet 524179 has consistently caused my Sparkfun FTDI basic module to disconnect from USB each time power is disconnected. The Phihong does not do that and I have concluded that it must be a grounding problem. To be clear my FTDI module in this case is being used to connect to a circuit that is powered by PoE but the FTDI module derives its power from a USB port, not the PoE adapter, on a computer that is connected to the same ground as the Intellinet 524179. Because of this I would steer clear of this mid-span device if possible.
Now a company called Silvertel has released a line of PoE modules that finally make adding PoE to your circuits a much easier proposition. With these new modules you only need 1 or 2 extra components to get yourself up and running which is a far cry from the 10 or more components I’ve seen in previous designs. Naturally you’ll need to have direct, board level access to the magnetics for the Ethernet connection so it won’t work in all circuits. There are some embedded modules that don’t expose the two taps needed on the TX and RX coil to make this all work so those modules will still be unable to use PoE right in their circuitry.
However, if you find that you’re working with a module that doesn’t have the proper taps you can always get a PoE splitter. These devices extract PoE power and either provide 48V or some lower regulated voltage and put that into a standard barrel connector. It’s not elegant but it works. You must avoid any hacks where you put raw voltage on spare Ethernet lines as tempting as they might be. Some people can get away with it during testing but there’s always the risk that you’ll fry something when you unexpectedly hook up the wrong port. Do yourself a favor and stick with the standards for consistency and safety.
I’m hoping to get some time next week to try Silvertel’s modules out. Once I do I’ll be posting my results and, if I’m successful, some information on how to convert your Netduino Plus into a Netduino Plus with PoE. Either way I’ll post updates next week and keep everyone up to date on my progress. I expect that if it works PoE will be a major player in most or all of my future projects.
What projects do you have that you would like to add PoE to? What has stopped you from doing it so far other than a lack of time? Post in the comments and let me know.
Update 2012-06-16: This still happens on the 8.0.4 update so change the values that read “8.0.3” to “8.0.4” if you are using 8.0.4. Also, if you have patched previously and try to run the script again after an upgrade you need to remove a file called “/usr/lib/vmware/modules/source/.patched” first. The script will let you know that it won’t patch because it has already been done if you forget. Just delete it and re-run the script.
Today I upgraded to VMware Workstation 8.0.3 and immediately I ran into the following error message:
make[1]: Entering directory `/usr/src/linux-headers-3.2.0-2-amd64'
  CC [M]  /tmp/vmware-root/modules/vmnet-only/userif.o
  CC [M]  /tmp/vmware-root/modules/vmnet-only/netif.o
  CC [M]  /tmp/vmware-root/modules/vmnet-only/filter.o
/tmp/vmware-root/modules/vmnet-only/userif.c: In function ‘VNetCsumCopyDatagram’:
/tmp/vmware-root/modules/vmnet-only/userif.c:520:3: error: incompatible type for argument 1 of ‘kmap’
/usr/src/linux-headers-3.2.0-2-common/include/linux/highmem.h:48:21: note: expected ‘struct page *’ but argument is of type ‘const struct <anonymous>’
/tmp/vmware-root/modules/vmnet-only/userif.c:523:3: error: incompatible type for argument 1 of ‘kunmap’
/usr/src/linux-headers-3.2.0-2-common/include/linux/highmem.h:54:20: note: expected ‘struct page *’ but argument is of type ‘const struct <anonymous>’
/tmp/vmware-root/modules/vmnet-only/netif.c: In function ‘VNetNetIfSetup’:
/tmp/vmware-root/modules/vmnet-only/netif.c:134:7: error: unknown field ‘ndo_set_multicast_list’ specified in initializer
/tmp/vmware-root/modules/vmnet-only/netif.c:134:7: warning: initialization from incompatible pointer type [enabled by default]
/tmp/vmware-root/modules/vmnet-only/netif.c:134:7: warning: (near initialization for ‘vnetNetifOps.ndo_validate_addr’) [enabled by default]
make[4]: *** [/tmp/vmware-root/modules/vmnet-only/userif.o] Error 1
make[4]: *** Waiting for unfinished jobs....
make[4]: *** [/tmp/vmware-root/modules/vmnet-only/netif.o] Error 1
For over a week now I’ve been cleaning up some legacy code that uses Spring and Hibernate to persist and process data in a SQL database. The code works but it doesn’t follow the strict philosophy of service oriented architecture in the sense that there are several places that Spring and Hibernate weren’t doing what they were expected to do and a few workarounds had to be implemented. Since we were bringing more programmers on board I wanted to make sure that everything played by the rules and was easy to update so I had to learn a lot that I had glossed over in the past.
With some creative Googling I found two invaluable resources that I need to give credit to:
Here’s what I distilled out of everything I went through:
@Transactional annotations only work on public methods. If you have a private or protected method with this annotation there’s no (easy) way for Spring AOP to see the annotation. It doesn’t go crazy trying to find them so make sure all of your annotated methods are public.
Transaction boundaries are only created when properly annotated (see above) methods are called through a Spring proxy. This means that you need to call your annotated method directly through an @Autowired bean or the transaction will never start. If you call a method on an @Autowired bean that isn’t annotated which itself calls a public method that is annotated YOUR ANNOTATION IS IGNORED. This is because Spring AOP is only checking annotations when it first enters the @Autowired code.
Never blindly trust that your @Transactional annotations are actually creating transaction boundaries. When in doubt test whether a transaction really is active (see below)
My first problem was that the code was annotated improperly like this:
1234567891011121314151617181920212223
/** * This code example is BAD code, do not use it! */classNonWorkingMyClass{@AutowiredprotectedMyServicemyService;publicvoidcalledFirst(){// Do some setup work...// Call our internal methodcalledSecond();}@TransactionalprivatevoidcalledSecond(){MyObjectmyObject=myService.retrieveLatest();// Update some object fieldsmyObject.setName("New Name");}}
In this case someone would call NonWorkingMyClass.calledFirst(), it would then call calledSecond() and try to update the name field. This works if your XML configuration is set up properly but it will not be in a transaction. This can cause concurrency issues that won’t show up until it’s really inconvenient.
Here’s the working version of that code:
1234567891011121314151617181920212223
/** * This code example works */classWorkingMyClass{@AutowiredprotectedMyServicemyService;@TransactionalpublicvoidcalledFirst(){// Do some setup work...// Call our internal methodcalledSecond();}privatevoidcalledSecond(){MyObjectmyObject=myService.retrieveLatest();// Update some object fieldsmyObject.setName("New Name");}}
Now when someone called WorkingMyClass.calledFirst() it would do what you expect in a transaction and the transaction boundaries are properly respected.
This looks like a simple fix that should only take a few minutes but finding out that was the problem involved turning on lots of Spring DEBUG level logging, Googling, and actually testing to make sure the transactions were active. Before I knew what I know now I used some code from the first site I listed to show if I was inside a transaction or not. I was shocked and relieved when it showed that I wasn’t because it meant the concurrency issues weren’t due to bad programming, just bad configuration. Here are the methods that I came up with that you can use to see if you are in a transaction and even force your code to throw an exception if it isn’t. This can be invaluable if someone messes up an annotation in the future or breaks your XML configuration.
This code belongs in a utility class that is accessible from anywhere. There are two flags you will need to put somewhere:
transactionDebugging – Indicates we should do the transaction tests
verboseTransactionDebugging – Indicates we should print debug messages with the transaction tests
verboseTransactionDebugging has no effect if transactionDebugging is false.
classDebugUtils{privatestaticfinalbooleantransactionDebugging=true;privatestaticfinalbooleanverboseTransactionDebugging=true;publicstaticvoidshowTransactionStatus(Stringmessage){System.out.println(((transactionActive())?"[+] ":"[-] ")+message);}// Some guidance from: http://java.dzone.com/articles/monitoring-declarative-transac?page=0,1publicstaticbooleantransactionActive(){try{ClassLoadercontextClassLoader=Thread.currentThread().getContextClassLoader();ClasstsmClass=contextClassLoader.loadClass("org.springframework.transaction.support.TransactionSynchronizationManager");BooleanisActive=(Boolean)tsmClass.getMethod("isActualTransactionActive",null).invoke(null,null);returnisActive;}catch(ClassNotFoundExceptione){e.printStackTrace();}catch(IllegalArgumentExceptione){e.printStackTrace();}catch(SecurityExceptione){e.printStackTrace();}catch(IllegalAccessExceptione){e.printStackTrace();}catch(InvocationTargetExceptione){e.printStackTrace();}catch(NoSuchMethodExceptione){e.printStackTrace();}// If we got here it means there was an exceptionthrownewIllegalStateException("ServerUtils.transactionActive was unable to complete properly");}publicstaticvoidtransactionRequired(Stringmessage){// Are we debugging transactions?if(!transactionDebugging){// No, just returnreturn;}// Are we doing verbose transaction debugging?if(verboseTransactionDebugging){// Yes, show the status before we get to the possibility of throwing an exceptionshowTransactionStatus(message);}// Is there a transaction active?if(!transactionActive()){// No, throw an exceptionthrownewIllegalStateException("Transaction required but not active ["+message+"]");}}}
In our previous code example we could use these new methods like this:
123456789101112131415161718192021222324252627
/** * This code example works */classWorkingMyClass{@AutowiredprotectedMyServicemyService;@TransactionalpublicvoidcalledFirst(){// Make sure we're using transactions. Include the name of the class and method// so it is easier to track down later if there are problems.DebugUtils.transactionRequired("WorkingMyClass.calledFirst");// Do some setup work...// Call our internal methodcalledSecond();}privatevoidcalledSecond(){MyObjectmyObject=myService.retrieveLatest();// Update some object fieldsmyObject.setName("New Name");}}
That’s it. Post in the comments if this helps you out or if you want to add to the code.